A fast website for every publication.
Every publication gets a website the moment it is created, and posts appear on it when you publish them to the web. Pages render on the server, run no JavaScript of their own and load nothing from other companies.
-
Step 1
Choose a template
A template is the design of your home page and archive. Post pages keep the same reading layout in all of them, with the template's typeface. Switch at any time: your posts, pages and settings stay as they are.
- Built for phones and dark mode, with a tidy "first issue is on its way" page and the signup form while you have no posts yet.
- Signed-in subscribers see your posts instead of the signup screen on Gate, and no signup form on Letter and Launch.
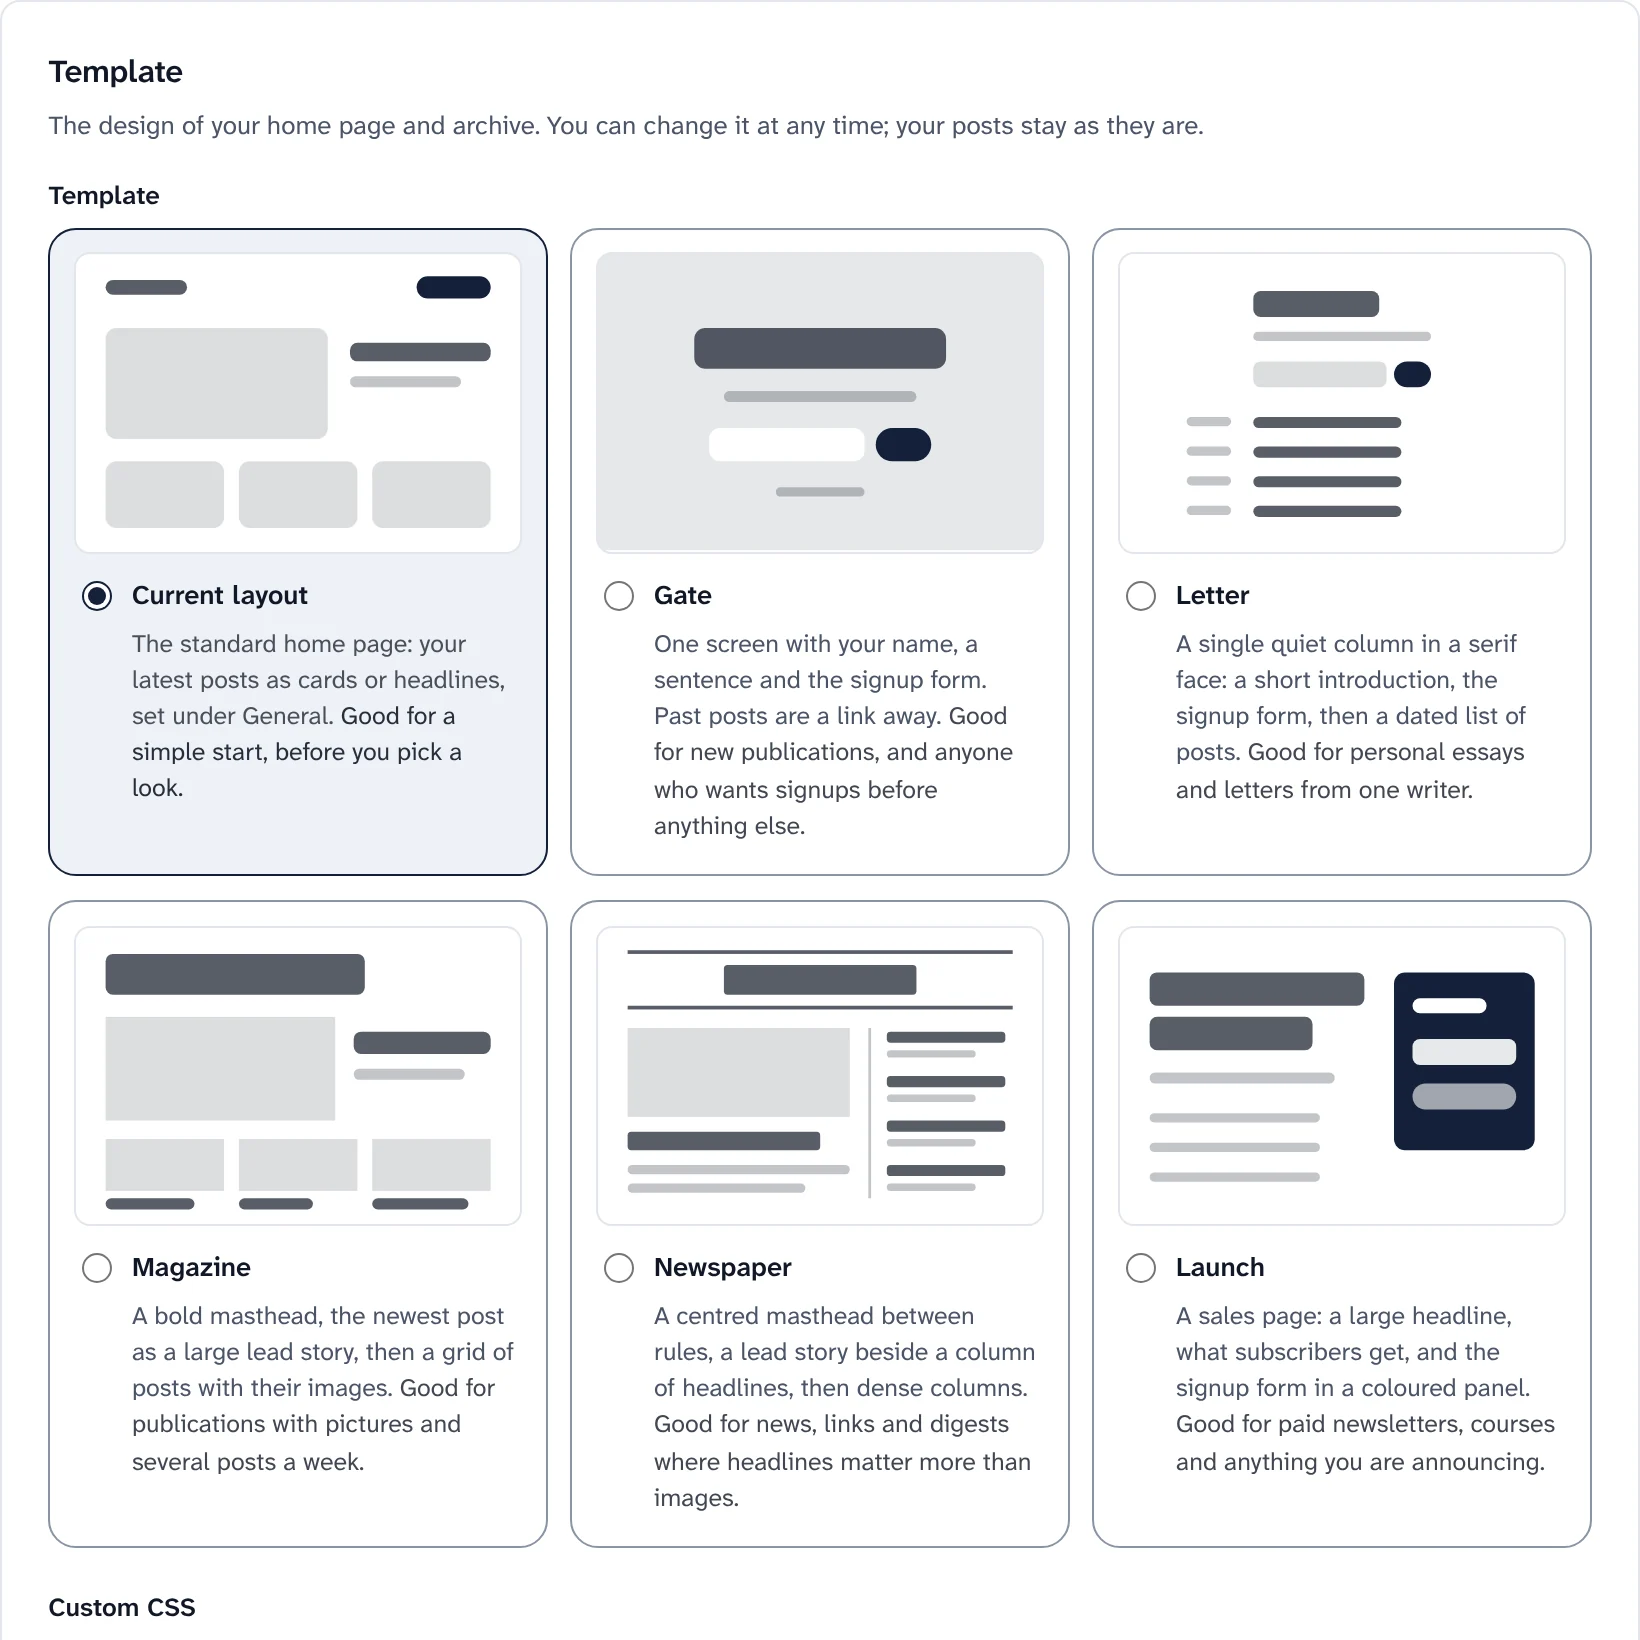
The template picker. Posts, pages and settings stay as they are when you switch. Website templates Template What a visitor sees first Good for Current layout Your latest posts as cards or as headlines A simple start, before you pick a look Gate One screen with your name, a sentence and the signup form New publications, and signups before anything else Letter A single quiet column in a serif face, the form, then a dated list Personal essays and letters from one writer Magazine A bold masthead, a large lead story, then a grid with images Publications with pictures and several posts a week Newspaper A centred masthead, a lead story beside headlines, then dense columns News, links and digests where headlines matter most Launch A large headline, what subscribers get, and the form in a coloured panel Paid newsletters, courses and anything you announce -
Step 2
Set your logo and accent colour once
The logo and accent colour belong to the publication, so your website, emails and signup forms share them. Pick any colour: button text turns black or white, whichever reads better, and links are adjusted until they pass the usual contrast standard.
- Template settings: a headline and a pitch, the benefits on Launch, the subscriber count (shown from 100), the font, and a page and text colour of your own.
- Light, dark or the reader's choice, and drop caps if you like them.
- Custom CSS for admins, which can't load anything from elsewhere or run code.
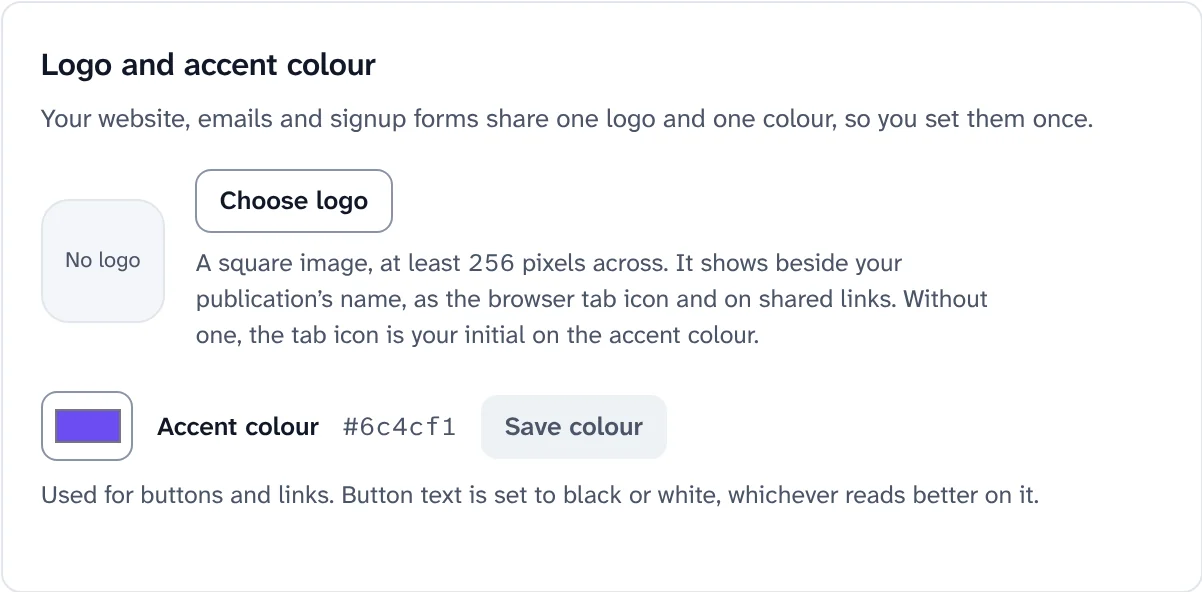
Logo and accent colour, shared with your emails and forms. -
Step 3
Add pages, and landing pages built around one form
Write pages in the same editor as posts, for an About page, a contact page or a reading list. A page starts as a draft and goes on the site at its own address when you publish it, in the header if you tick Show in the navigation.
- Landing pages carry your name and design but no navigation, search or footer links, so nothing leads a visitor away from the form. Start from newsletter signup, free download or waitlist.
- Navigation and sections: up to 20 header links, and sections such as Essays and Links, each with its own page.
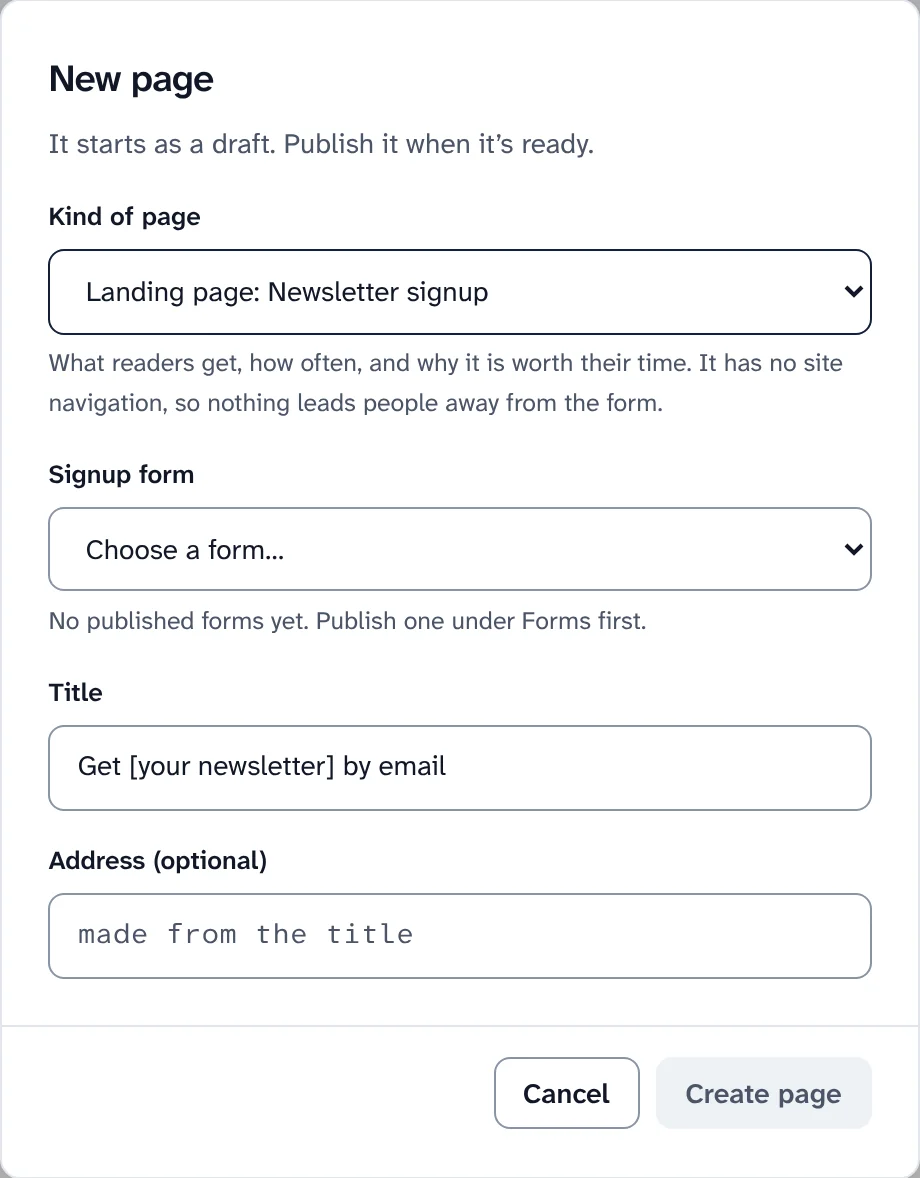
A new landing page from the Newsletter signup starter. -
Step 4
Everything a reader expects, from the first post
Posts appear on your website when you publish them to the web. Every page has a Subscribe button and a signup form, so a visitor can join from wherever they are. Readers sign in with a link sent to their email address; there are no passwords.
- Fast and private: pages are rendered on the server and cached close to readers, run no JavaScript of their own, and load nothing from other companies.
- The paywall shows the free part of a paid post and a panel to subscribe or sign in. Search and feeds never show more than the post page.
Screenshot to comeA publication website in the Letter template, with its signup form and posts.A publication website in the Letter template. What is on every publication website Address What it is /The home page: your latest posts and a signup form /archiveEvery post, newest first, with a Top tab for the most read /p/<post>A post /s/<section>The posts in one section /searchSearch across your posts, never past a paywall /subscribeThe plans page: free and paid plans /feed,/feed.jsonRSS and JSON feeds of your latest 50 posts /linksLink Hub, a link-in-bio page, when you turn it on /sitemapEvery page for readers; /sitemap.xmlfor search engines -
Step 5
Search engines and sharing, done for you
Every page has a title, a description and a canonical address. Shared links show a card with the post's title and picture, posts carry structured data, and
/sitemap.xmllists every post and page. Images are sent in modern formats and several sizes, and load when they are about to be seen.- Under SEO: a social image for pages without one, verification tokens for Google and Bing, and your profiles elsewhere.
- Paid posts in search, if you choose: verified search engines can read past the paywall while readers still stop at it.
- Bot rules decide whether AI crawlers may read the site, and redirects keep old addresses working after a move.
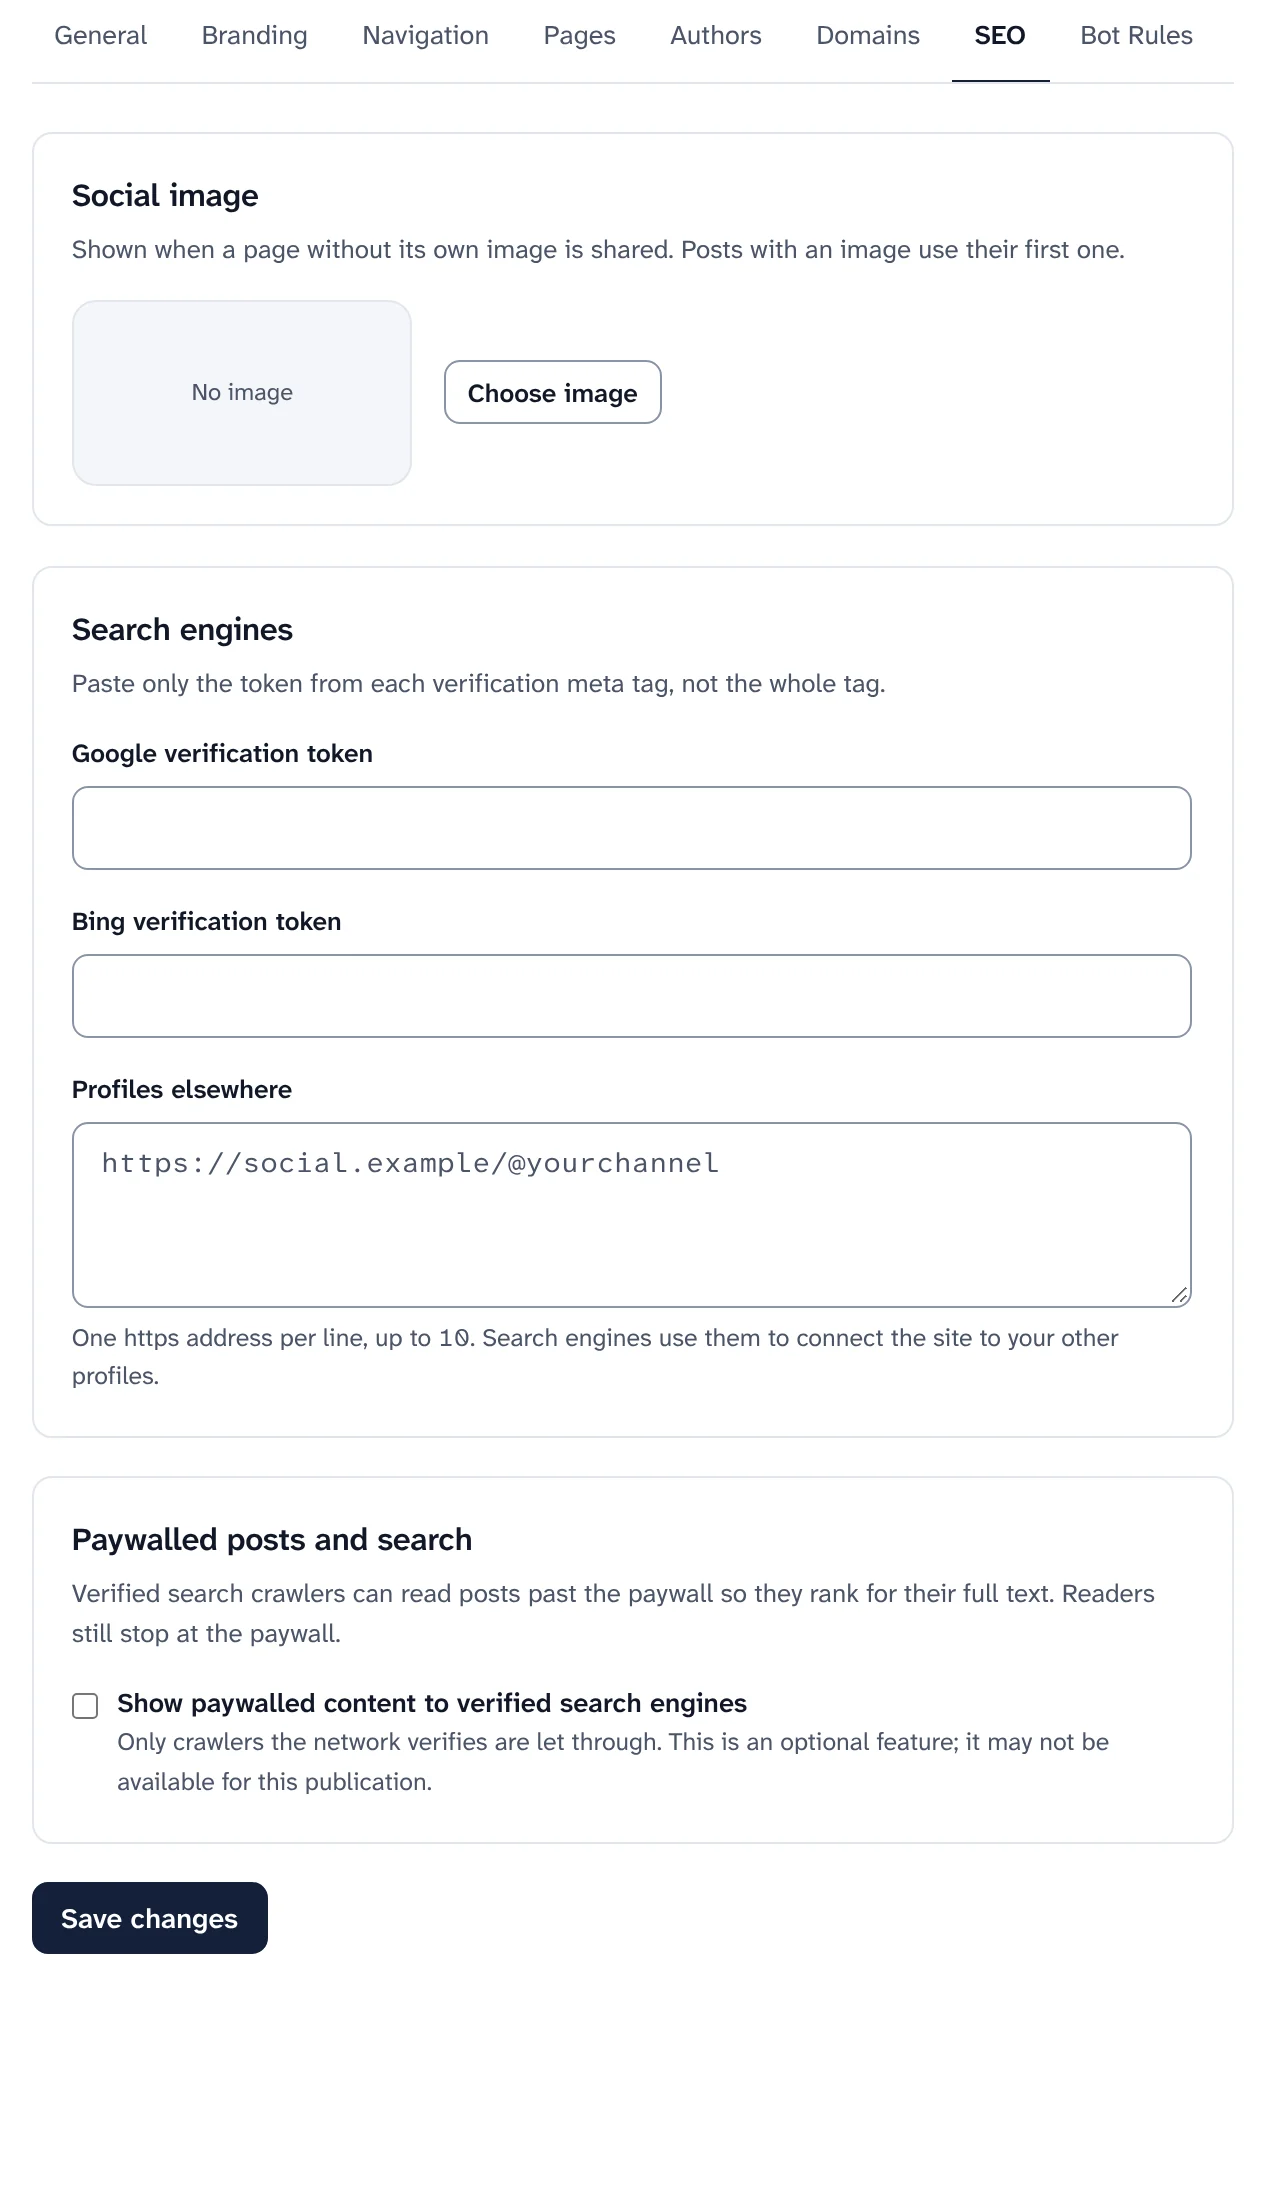
The SEO tab of a publication website. -
Step 6
Put it on your own domain
Every website starts at its address on your install, such as
fieldnotes.example.com. Under Website, Domains, admins can serve it from a domain they own, such aswww.example.com, with the bare domain redirecting to it. The first address keeps working, and search engines are told the new one is the real one.On your own install, turn on custom domains once with
pnpm swarm enable custom-domains. It needs Cloudflare for SaaS on your zone, and the installer asks for the token it needs.The domains guide lists the DNS records to add, step by step.
-
Step 7
Count visits without cookies
Website, Analytics shows page views and visitors by day, the top pages, where visitors came from, their devices and countries. It is counted at the edge without cookies or third-party scripts, and stored as daily totals.
Unique visitors are counted with a hash whose key changes every day and is deleted after a day, so the count is an estimate and nobody can be followed from one day to the next.
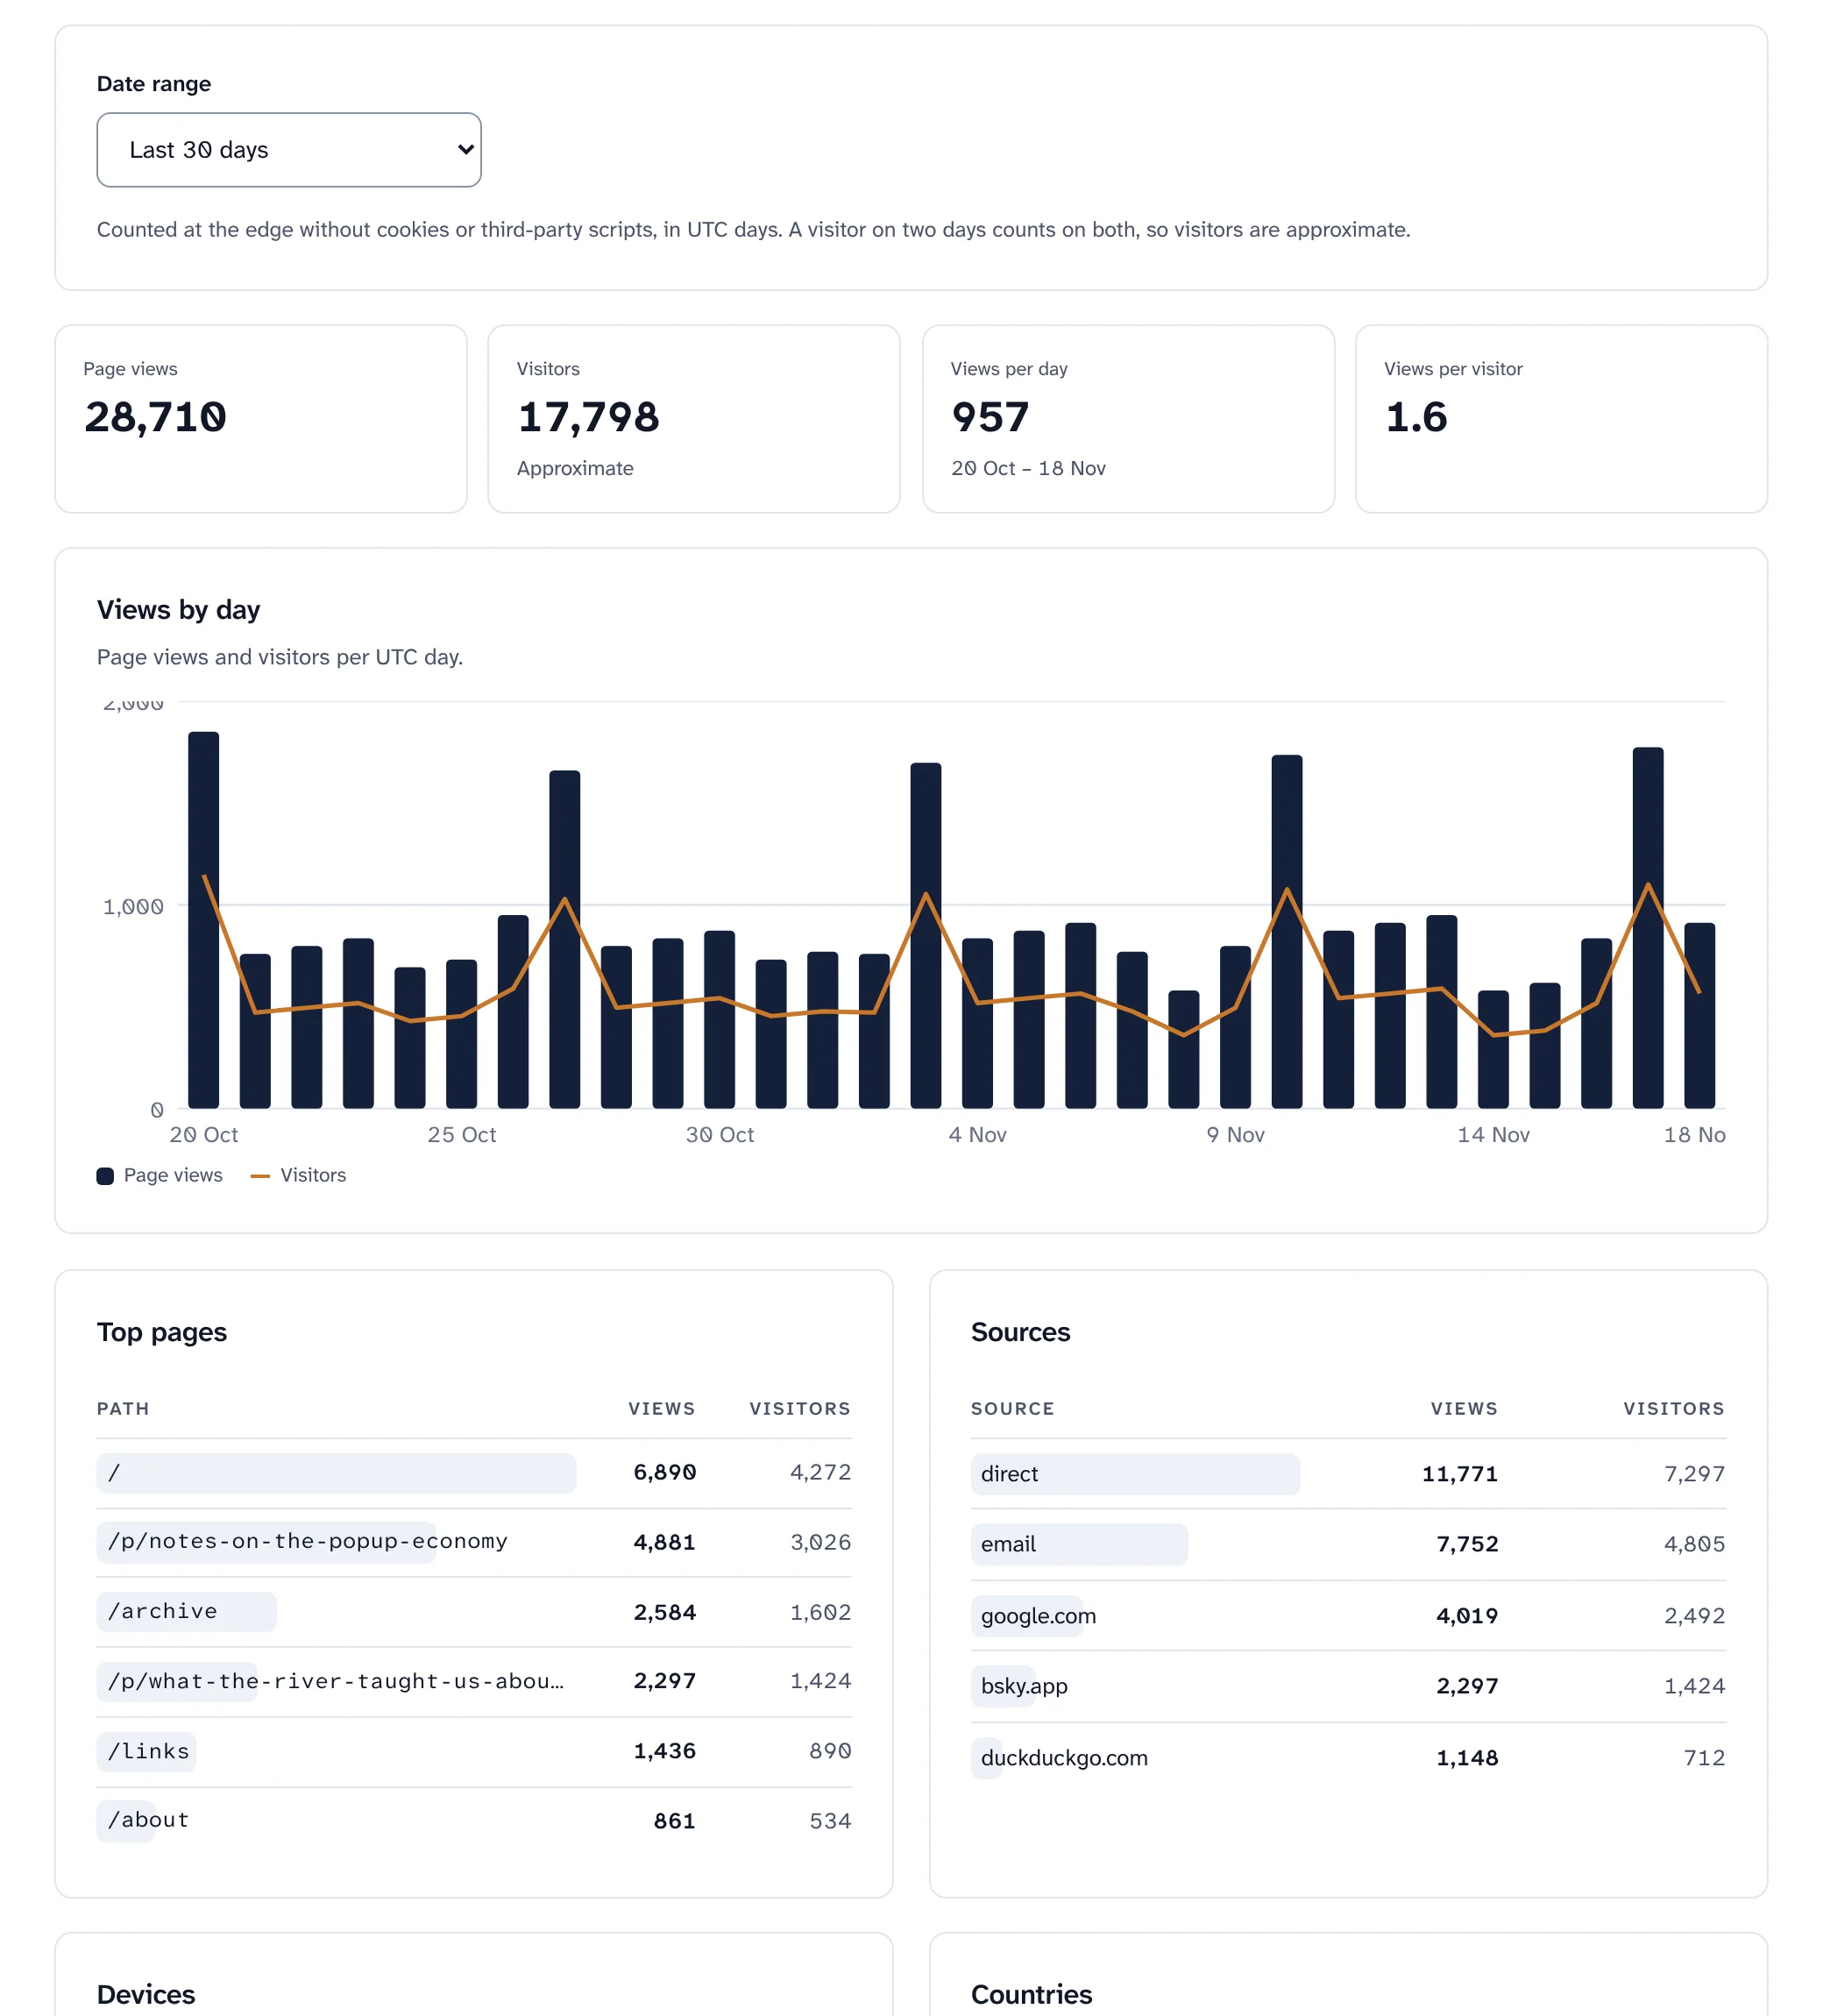
Analytics counted without cookies. Sample data. -
Step 8
Add your own tools, with the reader's agreement
Your website runs nothing from other companies unless you add it. Under Cookies and code, admins can add a cookie popup and tools such as analytics or a verification tag. Code marked Analytics or Marketing waits until the reader agrees; code marked Strictly necessary runs for everyone.
- Known tracking tools marked Strictly necessary need the owner's confirmation, which is kept in the audit log.
- On your own domain your code always runs. On the install's shared domain it runs only if the owner of the install allows it for your workspace.

The cookie popup, under Cookies and code.
Good to know
The website is part of every install, with nothing to set up. A few things depend on how your install is run.
- Custom domains need
pnpm swarm enable custom-domainsand Cloudflare for SaaS on your zone. - A staging install has no publication websites, because the wildcard address belongs to production.
- Import past issues brings posts from another platform onto your website. They are never emailed.
- Some tabs appear only when their feature is on for your install, such as Link Hub, author pages and sections.
This page shows the dashboard, not a website. The publication websites are served by their own worker, so the picture of one in step 4 is still to come.
Keep reading
A website from your first post.
Install Swarm and your first publication has a website straight away, at its own address on your domain.
Want to look first? pnpm swarm --dry-run shows every step and changes nothing.